Here are the Code examples of this chapter. These pages are currently being updated over time (adding pictures, captions, and possibly further examples). Visit again soon for updates. Of course, the best way to use this page is together with the book for getting the explanations.
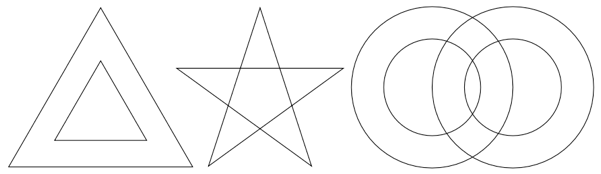
Figure 7.1 – Various paths
\documentclass[tikz,border=10pt]{standalone}
\usetikzlibrary{scopes}
\begin{document}
\begin{tikzpicture}
  \draw (90:2) -- (210:2) -- (330:2) -- cycle
        (90:1) -- (330:1) -- (210:1) -- cycle;
  {[shift={(3cm,0.35cm)},scale=1.65]
    \draw (90:1) -- (234:1) -- (18:1)
      -- (162:1) -- (306:1) -- cycle;
  }
  {[shift={(7cm,0.5cm)},scale=0.76]
    \draw (-1,0) circle (1.2) (-1,0) circle (2);
    \draw (1,0)  circle (1.2)  (1,0) circle (2);
  }
\end{tikzpicture}
\end{document}
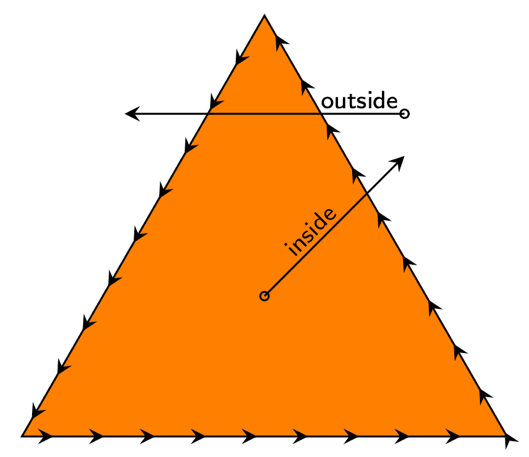
Figure 7.2 – The inside point and outside point
(Not book tutorial code, but my illustration source code)
\documentclass[tikz,border=10pt]{standalone}
\usetikzlibrary{decorations.markings,quotes}
\begin{document}
\begin{tikzpicture}[
    draw=black, fill=orange,
    decoration={markings,
    mark = between positions 0.04 and 1 step 0.035
        with {\arrow{stealth}}},
    every edge quotes/.style = {font=\sffamily\tiny,sloped,above,inner sep=1pt}
     ]
  \filldraw[postaction={decorate}] (90:2) -- (210:2) -- (330:2) -- cycle;
  \draw (0,0) circle[fill=black, radius=0.03]
    edge[-stealth,"inside" pos=0.4] (1,1);
  \draw (1,1.3) circle[fill=black, radius=0.03]
    edge[-stealth,"outside" pos=0.16] (-1,1.3);
\end{tikzpicture}
\end{document}
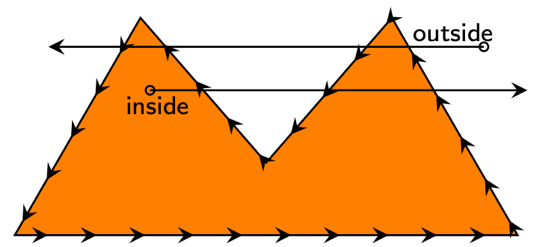
Figure 7.3 – The inside point and outside point with a complex path
(Not book tutorial code, but my illustration source code)
\documentclass[tikz,border=10pt]{standalone}
\usetikzlibrary{decorations.markings,quotes}
\begin{document}
\begin{tikzpicture}[
    draw=black, fill=orange,
    decoration={markings,
    mark = between positions 0.03 and 1 step 0.035
        with {\arrow{stealth}}},
    every edge quotes/.style = {font=\sffamily\tiny,sloped,above,inner sep=1pt}
     ]
  \filldraw[postaction={decorate}] (150:1) -- (210:2) -- (330:2) -- (30:1) -- (0,-0.5) -- cycle;
  \draw (-0.8,0) circle[fill=black, radius=0.03]
    edge[-stealth,"inside" {pos=0.02,below}] (1.8,0);
  \draw (1.5,0.3) circle[fill=black, radius=0.03]
    edge[-stealth,"outside" pos=0.07] (-1.5,0.3);
\end{tikzpicture}
\end{document}
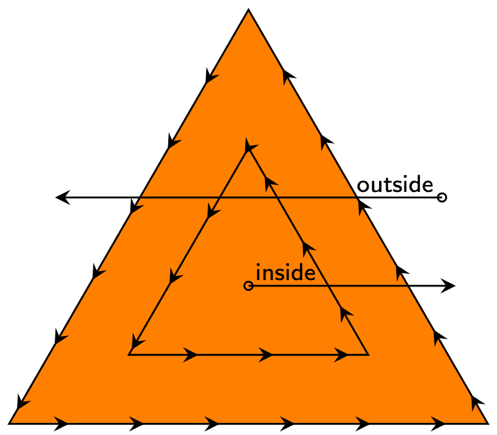
Figure 7.4 – Filling a path with two parts
\documentclass[tikz,border=10pt]{standalone}
\usetikzlibrary{decorations.markings,quotes}
\begin{document}
\begin{tikzpicture}[
    draw=black, fill=orange,
    decoration={markings,
    mark=  between positions 0.04 and 1 step 0.035
        with {\arrow{stealth}}},
    every edge quotes/.style = {font=\sffamily\tiny,sloped,above,inner sep=1pt}
     ]
  \filldraw[postaction={decorate}] (90:2) -- (210:2) -- (330:2) -- cycle
        (90:1) -- (210:1) -- (330:1) -- cycle;
  \draw (0,0) circle[fill=black,radius=0.03] edge[-stealth,"inside" pos=0.18] (1.5,0);
  \draw (1.4,0.64) circle[fill=black,radius=0.03] edge[-stealth,"outside" pos=0.12] (-1.4,0.64);
\end{tikzpicture}
\end{document}
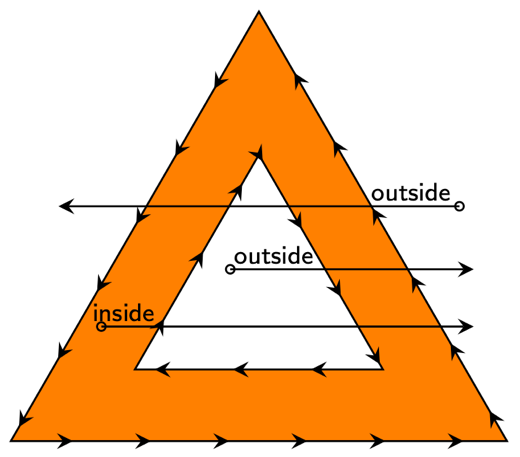
Figure 7.5 – Reversing a part of the path
\documentclass[tikz,border=10pt]{standalone}
\usetikzlibrary{decorations.markings,quotes}
\begin{document}
\begin{tikzpicture}[
    draw=black, fill=orange,
    decoration={markings,
    mark = between positions 0.04 and 1 step 0.035
        with {\arrow{stealth}}},
    every edge quotes/.style = {font=\sffamily\tiny,sloped,above,inner sep=1pt}
     ]
  \filldraw[postaction={decorate}] (90:2) -- (210:2) -- (330:2) -- cycle
        (90:1) -- (330:1) -- (210:1) -- cycle;
  \draw (-0.2,0.2) circle[fill=black,radius=0.03] edge[-stealth,"outside" pos=0.18] (1.5,0.2);
  \draw (1.4,0.64) circle[fill=black,radius=0.03] edge[-stealth,"outside" pos=0.12] (-1.4,0.64);
  \draw (-1.1,-0.2) circle[fill=black,radius=0.03] edge[-stealth,"inside" pos=0.06] (1.5,-0.2);
\end{tikzpicture}
\end{document}
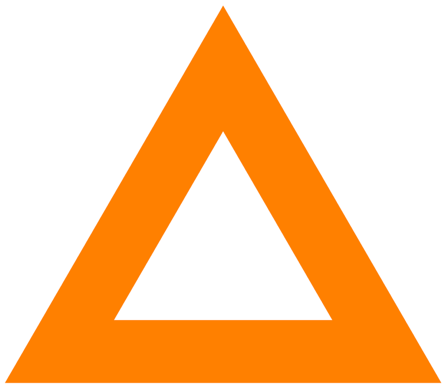
Figure 7.6 – A filled area between triangles
\documentclass[tikz,border=10pt]{standalone}
\begin{document}
\begin{tikzpicture}
  \fill[orange]
    (90:2) -- (210:2) -- (330:2) -- cycle
    (90:1) -- (330:1) -- (210:1) -- cycle;
\end{tikzpicture}
\end{document}

Figure 7.7 – A star path
\documentclass[tikz,border=10pt]{standalone}
\begin{document}
\begin{tikzpicture}
  %\draw[thin,dotted] (-3,-3) grid (3,3) (0,0) circle(1);
  \draw (90:1) -- (234:1) -- (18:1) -- (162:1)   -- (306:1) -- cycle;
\end{tikzpicture}
\end{document}

Figure 7.8 – Nonzero rule on the left and even odd rule on the right
\documentclass[tikz,border=10pt]{standalone}
\begin{document}
\begin{tikzpicture}
  %\draw[thin,dotted] (-3,-3) grid (3,3) (0,0) circle(1);
  \begin{scope}[xshift=-2.25cm]
    \fill[blue!50]
    (90:1) -- (234:1) -- (18:1) -- (162:1)   -- (306:1) -- cycle;
  \end{scope}  \fill[blue!50, even odd rule]
    (90:1) -- (234:1) -- (18:1) -- (162:1)   -- (306:1) -- cycle;
\end{tikzpicture}
\end{document}
Clipping
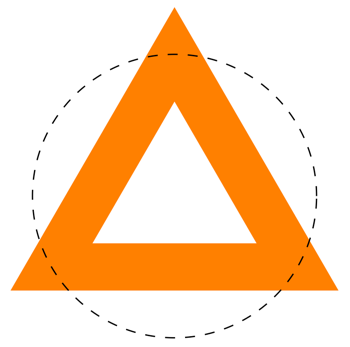
Figure 7.9 – A circle for clipping a triangle
\documentclass[tikz,border=10pt]{standalone}
\begin{document}
\begin{tikzpicture}
  \fill[orange]
    (90:2) -- (210:2) -- (330:2) -- cycle
    (90:1) -- (330:1) -- (210:1) -- cycle;
  \draw[dashed] (0,0) circle[radius=1.5];
\end{tikzpicture}
\end{document}
Figure 7.10 – A clipped triangle
\documentclass[tikz,border=10pt]{standalone}
\begin{document}
\begin{tikzpicture}
  \clip (0,0) circle[radius=1.5];
  \fill[orange]
    (90:2) -- (210:2) -- (330:2) -- cycle
    (90:1) -- (330:1) -- (210:1) -- cycle;
\end{tikzpicture}
\end{document}
Clipping two rings
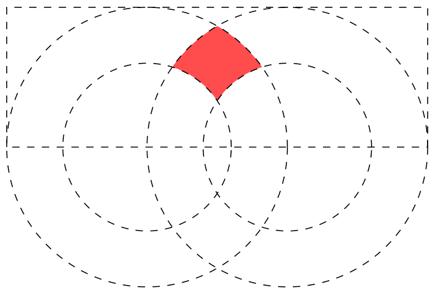
Figure 7.11 – A segment of intersecting rings
\documentclass[tikz,border=10pt]{standalone}
\begin{document}
\begin{tikzpicture}[even odd rule]
  \begin{scope}
    \clip (-3,0) rectangle (3,2);
    \clip (-1,0) circle (1.2) (-1,0) circle (2);
    \fill[red!70]  (1,0) circle (1.2)  (1,0) circle (2);
  \end{scope}
  \draw[dashed] (-3,0) rectangle (3,2);
  \draw[dashed] (-1,0) circle (1.2) (-1,0) circle (2);
  \draw[dashed]  (1,0) circle (1.2)  (1,0) circle (2);
\end{tikzpicture}
\end{document}

Figure 7.12 – Filled rings with nonzero rule
\documentclass[tikz,border=10pt]{standalone}
\begin{document}
\begin{tikzpicture}
  \fill[red!70] (-1,0) circle (1.2) (-1,0) circle (2);
  \fill[red!70]  (1,0) circle (1.2)  (1,0) circle (2);
\end{tikzpicture}
\end{document}

Figure 7.13 – Filled rings
\documentclass[tikz,border=10pt]{standalone}
\begin{document}
\begin{tikzpicture}[even odd rule]
\fill[red!70] (-1,0) circle (1.2) (-1,0) circle (2);
\fill[red!70] (1,0) circle (1.2) (1,0) circle (2);
\end{tikzpicture}
\end{document}
Figure 7.14 – Clipped rings
\documentclass[tikz,border=2pt]{standalone}
\begin{document}
\begin{tikzpicture}[even odd rule]
  \draw[dashed,gray] (-3,0) rectangle (3,2);
  \clip (-3,0) rectangle (3,2);
  \fill[red!70] (-1,0) circle (1.2) (-1,0) circle (2);
  \fill[red!70]  (1,0) circle (1.2)  (1,0) circle (2);
\end{tikzpicture}
\end{document}

Figure 7.15 – A clipped segment of the rings
\documentclass[tikz,border=10pt]{standalone}
\begin{document}
\begin{tikzpicture}[even odd rule]
  \clip (-3,0) rectangle (3,2);
  \clip (-1,0) circle (1.2) (-1,0) circle (2);
  \fill[red!70]  (1,0) circle (1.2)  (1,0) circle (2);
\end{tikzpicture}
\end{document}
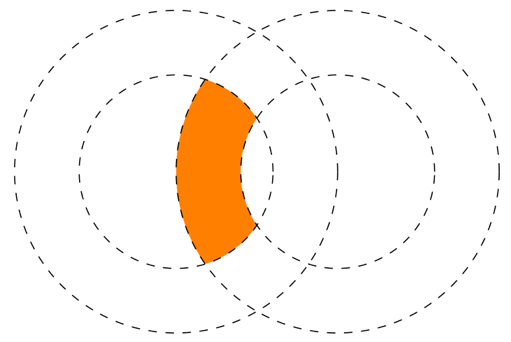
Figure 7.16 – Filling another segment
\documentclass[tikz,border=10pt]{standalone}
\begin{document}
\begin{tikzpicture}[even odd rule]
  \begin{scope}
    \clip (-1,0) circle (1.2);
    \fill[orange]  (1,0) circle (1.2)  (1,0) circle (2);
  \end{scope}
  \draw[dashed] (-1,0) circle (1.2) (-1,0) circle (2);
  \draw[dashed]  (1,0) circle (1.2)  (1,0) circle (2);
\end{tikzpicture}
\end{document}
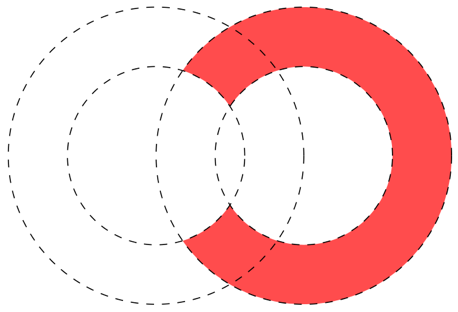
Figure 7.17 – Another segment to fill
\documentclass[tikz,border=10pt]{standalone}
\begin{document}
\begin{tikzpicture}[even odd rule]
%  \begin{scope}
%    \clip (-3,0) rectangle (3,2);
%    \clip (-1,0) circle (1.2) (-1,0) circle (2);
%    \fill[yellow!70]  (1,0) circle (1.2)  (1,0) circle (2);
%  \end{scope}
%  \begin{scope}
%    \clip (-1,0) circle (1.2);
%    \fill[orange]  (1,0) circle (1.2)  (1,0) circle (2);
%  \end{scope}
  \begin{scope}
    \clip (-1,0)  circle (1.2)
          (-2,-2) rectangle (3,2);
    \fill[red!70]  (1,0) circle (1.2)  (1,0) circle (2);
  \end{scope}
  %\draw[dashed] (-3,0) rectangle (3,2);
  \draw[dashed] (-1,0) circle (1.2) (-1,0) circle (2);
  \draw[dashed]  (1,0) circle (1.2)  (1,0) circle (2);
\end{tikzpicture}
\end{document}
Clipping ring with circle
\documentclass[tikz,border=10pt]{standalone}
\begin{document}
\begin{tikzpicture}[even odd rule]
  \clip (-1,0) circle (1.2);
  \fill[red!70]  (1,0) circle (1.2)  (1,0) circle (2);
  \draw[dashed] (-1,0) circle (1.2);
\end{tikzpicture}
\end{document}
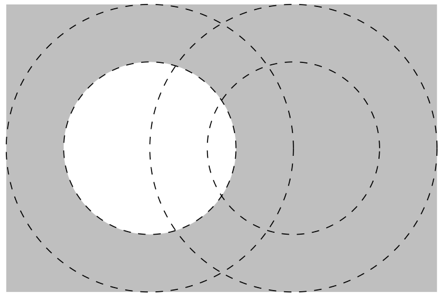
Figure 7.18 – The reverse clipping area
\documentclass[tikz,border=10pt]{standalone}
\begin{document}
\begin{tikzpicture}[even odd rule]
%  \begin{scope}
%    \clip (-3,0) rectangle (3,2);
%    \clip (-1,0) circle (1.2) (-1,0) circle (2);
%    \fill[yellow!70]  (1,0) circle (1.2)  (1,0) circle (2);
%  \end{scope}
%  \begin{scope}
%    \clip (-1,0) circle (1.2);
%    \fill[orange]  (1,0) circle (1.2)  (1,0) circle (2);
%  \end{scope}
  \begin{scope}
    \fill[gray!50] (-1,0)  circle (1.2)
          (-3,-2) rectangle (3,2);
    %\fill[red!70]  (1,0) circle (1.2)  (1,0) circle (2);
  \end{scope}
  %\draw[dashed] (-3,0) rectangle (3,2);
  \draw[dashed] (-1,0) circle (1.2) (-1,0) circle (2);
  \draw[dashed]  (1,0) circle (1.2)  (1,0) circle (2);
\end{tikzpicture}
\end{document}
Inverse clipping
\documentclass[tikz,border=10pt]{standalone}
\begin{document}
\begin{tikzpicture}[even odd rule]
  \clip (-1,0)  circle (1.2)
        (-2,-2) rectangle (3,2);
  \fill[red!70]  (1,0) circle (1.2)  (1,0) circle (2);
\end{tikzpicture}
\end{document}
Help lines and clipping path area
\documentclass[tikz,border=10pt]{standalone}
\begin{document}
\begin{tikzpicture}[even odd rule]
  \filldraw[dashed, draw=black, fill=gray!20]
    (-1,0)  circle (1.2)
    (-2.2,-2) rectangle (3,2);
  \clip (-1,0)  circle (1.2)
        (-2,-2) rectangle (3,2);
  \fill[red!70]  (1,0) circle (1.2)  (1,0) circle (2);
  \draw[dashed] (-1,0) circle (1.2);
\end{tikzpicture}
\end{document}
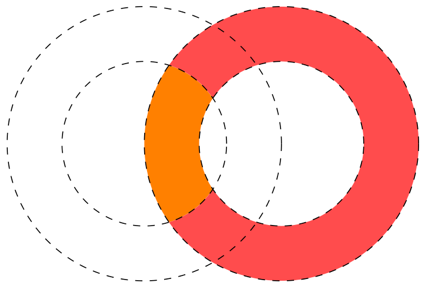
Figure 7.19 – Colored segments of a ring:
\documentclass[tikz,border=10pt]{standalone}
\begin{document}
\begin{tikzpicture}[even odd rule]
%  \begin{scope}
%    \clip (-3,0) rectangle (3,2);
%    \clip (-1,0) circle (1.2) (-1,0) circle (2);
%    \fill[yellow!70]  (1,0) circle (1.2)  (1,0) circle (2);
%  \end{scope}
  \begin{scope}
    \clip (-1,0) circle (1.2);
    \fill[orange]  (1,0) circle (1.2)  (1,0) circle (2);
  \end{scope}
  \begin{scope}
    \clip (-1,0)  circle (1.2)
          (-2,-2) rectangle (3,2);
    \fill[red!70]  (1,0) circle (1.2)  (1,0) circle (2);
  \end{scope}
  %\draw[dashed] (-3,0) rectangle (3,2);
  \draw[dashed] (-1,0) circle (1.2) (-1,0) circle (2);
  \draw[dashed]  (1,0) circle (1.2)  (1,0) circle (2);
\end{tikzpicture}
\end{document}
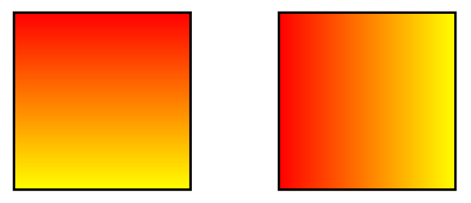
Figure 7.20 – Squares with shading
\documentclass[tikz,border=10pt]{standalone}
\begin{document}
\begin{tikzpicture}
  \shadedraw [top color=red, bottom color=yellow]
    (0,0) rectangle (1,1);
  \shadedraw [left color=red, right color=yellow]
    (1.5,0) rectangle (2.5,1);
\end{tikzpicture}
\end{document}
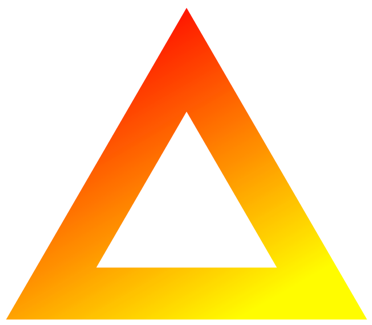
Figure 7.21 – A triangle with rotated shading
\documentclass[tikz,border=10pt]{standalone}
\begin{document}
\begin{tikzpicture}
  \shade[top color=red, bottom color=yellow,
    shading angle=30]
    (90:2) -- (210:2) -- (330:2) -- cycle
    (90:1) -- (330:1) -- (210:1) -- cycle;
\end{tikzpicture}
\end{document}
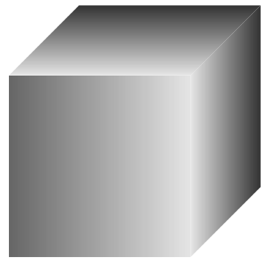
Figure 7.22 – A shaded cube
\documentclass[tikz,border=10pt]{standalone}
\begin{document}
\begin{tikzpicture}
  \shade[left color=black!60, right color=black!10]
    (0,0,0) -- (1,0,0)  -- (1,1,0)  -- (0,1,0);
  \shade[left color=black!10, right color=black!80]
    (1,0,0) -- (1,0,-1) -- (1,1,-1) -- (1,1,0);
  \shade[bottom color=black!10, top color=black!80]
    (0,1,0) -- (0,1,-1) -- (1,1,-1) -- (1,1,0);
\end{tikzpicture}
\end{document}
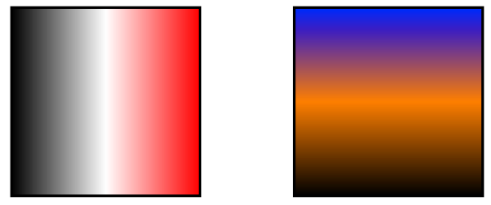
Figure 7.23 – Axis shading with a middle color
\documentclass[tikz,border=10pt]{standalone}
\begin{document}
\begin{tikzpicture}
  \shadedraw [left color= black, right color=red,
    middle color=white] (0,0) rectangle (1,1);
  \shadedraw [bottom color=black, top color=blue,
    middle color=orange] (1.5,0) rectangle (2.5,1);
\end{tikzpicture}
\end{document}
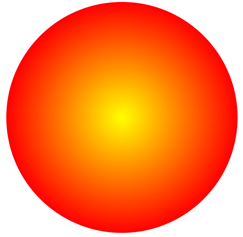
Figure 7.24 – Radial shading
\documentclass[tikz,border=10pt]{standalone}
\begin{document}
\begin{tikzpicture}
  \shade[inner color=yellow, outer color=red]
    (0,0) circle (1);
\end{tikzpicture}
\end{document}
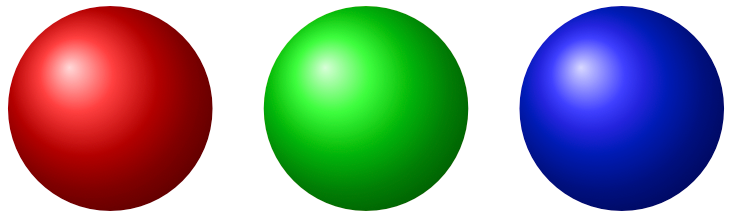
Figure 7.25 – Ball shading
\documentclass[tikz,border=10pt]{standalone}
\begin{document}
\begin{tikzpicture}
  \shade[ball color=red]   (0,0)   circle (1);
  \shade[ball color=green] (2.5,0) circle (1);
  \shade[ball color=blue]  (5,0)  circle (1);
\end{tikzpicture}
\end{document}
The PDF result of the remaining examples may not be properly displayed in the web browser. You can download them via the download button in the top right corner of the PDF widget.
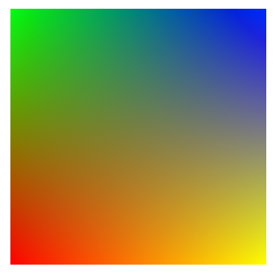
Figure 7.26 – Bilinear interpolation
\documentclass[tikz,border=10pt]{standalone}
\usetikzlibrary{shadings}
\begin{document}
\begin{tikzpicture}
  \shade[upper left=green, upper right=blue,
       lower left=red,   lower right=yellow]
       (0,0) rectangle (1,1);
\end{tikzpicture}
\end{document}
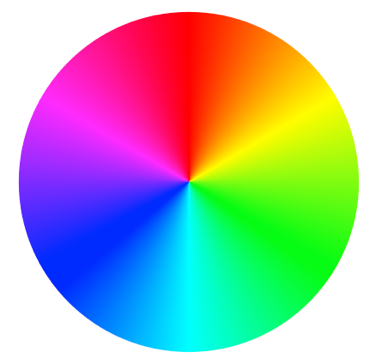
Figure 7.27 – Color wheel shading
\documentclass[tikz,border=10pt]{standalone}
\usetikzlibrary{shadings}
\begin{document}
\begin{tikzpicture}
  \shade[shading=color wheel] (0,0) circle (1);
\end{tikzpicture}
\end{document}

Figure 7.28 – Color ring
\documentclass[tikz,border=10pt]{standalone}
\usetikzlibrary{shadings}
\begin{document}
\begin{tikzpicture}
  \shade[shading=color wheel, even odd rule]
    (1,0) circle (1.2) (1,0) circle (2);
\end{tikzpicture}
\end{document}

Figure 7.29 – The color triangle
\documentclass[tikz,border=10pt]{standalone}
\usetikzlibrary{shadings}
\begin{document}
\begin{tikzpicture}
  \shade[shading=color wheel]
    (90:2) -- (210:2) -- (330:2);
\end{tikzpicture}
\end{document}
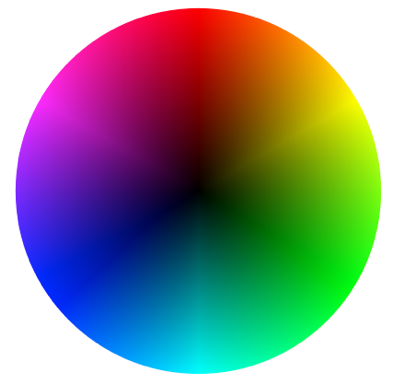
Figure 7.30 – Color wheel with black center
\documentclass[tikz,border=10pt]{standalone}
\usetikzlibrary{shadings}
\begin{document}
\begin{tikzpicture}
  \shade[shading=color wheel black center] (0,0) circle (1);
\end{tikzpicture}
\end{document}
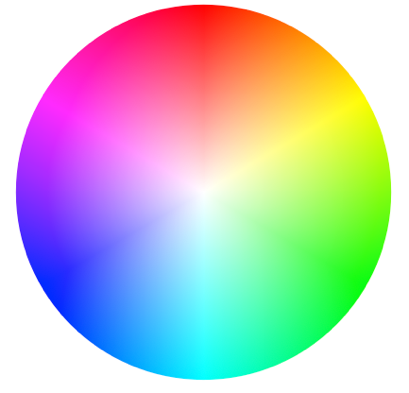
Figure 7.31 – Color wheel with white center
\documentclass[tikz,border=10pt]{standalone}
\usetikzlibrary{shadings}
\begin{document}
\begin{tikzpicture}
  \shade[shading=color wheel white center] (0,0) circle (1);
\end{tikzpicture}
\end{document}
Please rate (and possibly review) the book on Amazon if you got it there, your feedback means much to me and helps to get an extended second edition!
Go to next chapter.