Here are the Code examples of this chapter. These pages are currently being updated over time (adding pictures, captions, and possibly further examples). Visit again soon for updates. Of course, the best way to use this page is together with the book for getting the explanations.

Figure 9.1 – A duck swimming in water
\documentclass[tikz,border=10pt]{standalone}
\usetikzlibrary{shapes.geometric,decorations.pathmorphing,backgrounds}
\usepackage{tikzducks}
\begin{document}
\begin{tikzpicture}
  \duck[laughing]
  \fill[top color=white, bottom color=blue, opacity=0.5]
    (-1,-0.2) -- (-1,0.5)
    decorate[decoration={snake}]{-- (3,0.5)} -- (3,-0.2);
\end{tikzpicture}
\end{document}
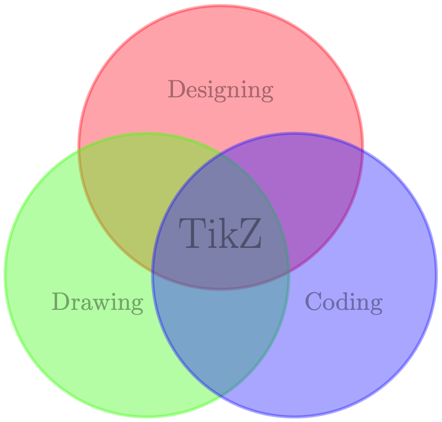
Figure 9.2 – A fully transparent diagram
\documentclass[tikz,border=10pt]{standalone}
\begin{document}
\begin{tikzpicture}[very thick,opacity=0.4]
  \filldraw[red]   ( 90:1.2) circle (2);
  \filldraw[green] (210:1.2) circle (2);
  \filldraw[blue]  (330:1.2) circle (2);
  \node at ( 90:2)    {Designing};
  \node at (210:2)    {Drawing};
  \node at (330:2)    {Coding};
  \node [font=\LARGE] {TikZ};
\end{tikzpicture}
\end{document}
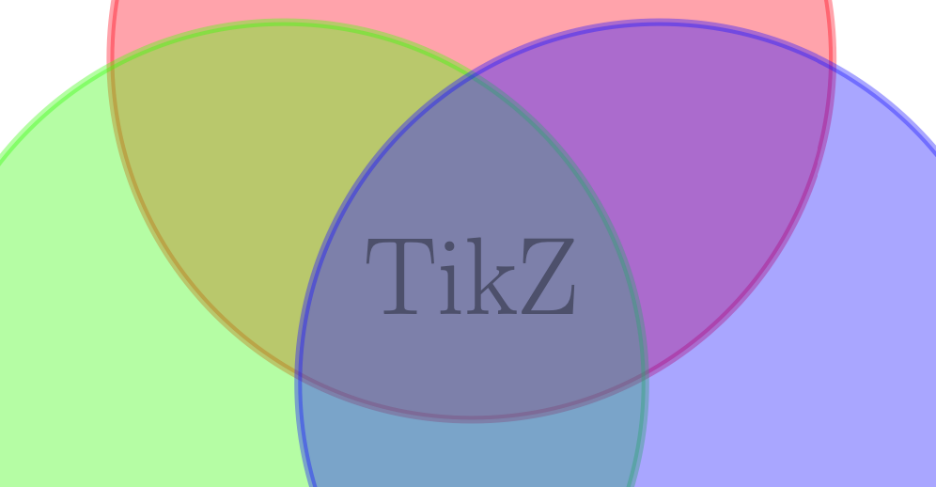
Figure 9.3 – Borders of areas with transparency
\documentclass[tikz,border=10pt]{standalone}
\begin{document}
\begin{tikzpicture}[very thick, opacity=0.4]
  \filldraw[red]   ( 90:1.2) circle (2);
  \filldraw[green] (210:1.2) circle (2);
  \filldraw[blue]  (330:1.2) circle (2);
  \node at ( 90:2)    {Designing};
  \node at (210:2)    {Drawing};
  \node at (330:2)    {Coding};
  \node [font=\LARGE] {TikZ};
\end{tikzpicture}
\end{document}
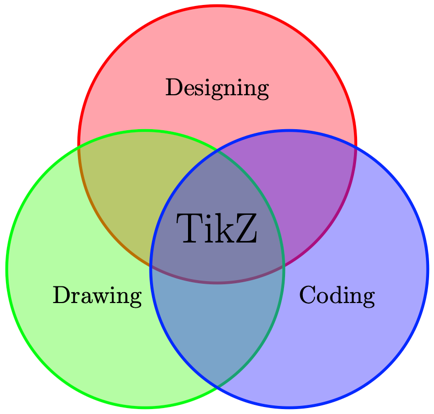
Figure 9.4 – Transparent areas with opaque curves and text
\documentclass[tikz,border=10pt]{standalone}
\begin{document}
\begin{tikzpicture}[very thick, fill opacity=0.4]
  \filldraw[red]   ( 90:1.2) circle (2);
  \filldraw[green] (210:1.2) circle (2);
  \filldraw[blue]  (330:1.2) circle (2);
  \node at ( 90:2)    {Designing};
  \node at (210:2)    {Drawing};
  \node at (330:2)    {Coding};
  \node [font=\LARGE] {TikZ};
\end{tikzpicture}
\end{document}
\documentclass[tikz,border=10pt]{standalone}
\begin{document}
\begin{tikzpicture}[very thick, fill opacity=0.4, text opacity=1]
  \filldraw[red]   ( 90:1.2) circle (2);
  \filldraw[green] (210:1.2) circle (2);
  \filldraw[blue]  (330:1.2) circle (2);
  \node at ( 90:2)    {Designing};
  \node at (210:2)    {Drawing};
  \node at (330:2)    {Coding};
  \node [font=\LARGE] {TikZ};
\end{tikzpicture}
\end{document}

Figure 9.5 – Overlapping transparent objects
\documentclass[tikz,border=10pt]{standalone}
\usepackage{babel}
\usepackage{blindtext}
\begin{document}
\begin{tikzpicture}
  \begin{scope}[opacity=0.6]
    \draw [line width=4mm, red] circle(1);
    \fill[rounded corners, fill=red, rotate=15]
      (-1.3,-0.2) rectangle (1.3,0.2);
  \end{scope}
  \node[rotate=15] {TOP SECRET};
\end{tikzpicture}
\end{document}

Figure 9.6 – Grouping transparency
\documentclass[tikz,border=10pt]{standalone}
\usepackage{babel}
\usepackage{blindtext}
\begin{document}
\begin{tikzpicture}
  \begin{scope}[opacity=0.6, transparency group]
    \draw [line width=4mm, red] circle(1);
    \fill[rounded corners, fill=red, rotate=15]
      (-1.3,-0.2) rectangle (1.3,0.2);
  \end{scope}
  \node[rotate=15] {TOP SECRET};
\end{tikzpicture}
\end{document}
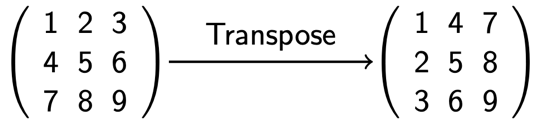
Figure 9.7 – Drawing to display transposing a matrix
\documentclass[tikz,border=10pt]{standalone}
\usetikzlibrary{matrix,positioning,quotes,decorations.pathreplacing,arrows.meta}
\tikzset{standard/.style={matrix of nodes, left delimiter={(},
  right delimiter={)}, inner sep=0pt, nodes={inner sep=0.3em}}}
\begin{document}
\begin{tikzpicture}[every node/.append style={font=\sffamily}]
  \matrix[standard] (m)  {
       1 & 2 & 3 \\
       4 & 5 & 6 \\
       7 & 8 & 9 \\};
  \matrix[standard,right = 3cm of m] (n) {
       1 & 4 & 7 \\
       2 & 5 & 8 \\
       3 & 6 & 9 \\};
  \draw[->,shorten <=1em,shorten >=1em,thick] (m.east) to["Transpose"] (n);
\end{tikzpicture}
\end{document}
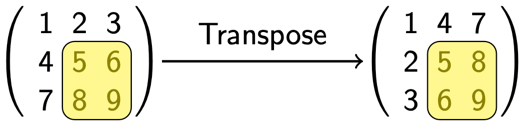
Figure 9.8 – Highlighting a part of a matrix
\documentclass[tikz,border=10pt]{standalone}
\usetikzlibrary{matrix,positioning,quotes,tikzmark}
\tikzset{standard/.style = {matrix of nodes, inner sep=0pt,
  nodes={inner sep=0.3em},
  left delimiter={(}, right delimiter={)}}}
\tikzset{submatrix/.style = {rectangle, rounded corners,
  fill=yellow, fill opacity=0.5}}
\tikzset{every node/.append style = {font=\sffamily}}
\begin{document}
\begin{tikzpicture}
  \matrix[standard] (m)  {
       1 & 2 & 3 \\
       4 & 5 & 6 \\
       7 & 8 & 9 \\};
  \matrix[standard,right = 3cm of m] (n) {
       1 & 4 & 7 \\
       2 & 5 & 8 \\
       3 & 6 & 9 \\};
  \draw[->,shorten <=1em, shorten >=1em, thick]
    (m.east) to["Transpose"] (n);
\draw[submatrix] (m-2-2.north west) rectangle (m-3-3.south east);
\draw[submatrix] (n-2-2.north west) rectangle (n-3-3.south east);
\end{tikzpicture}
\end{document}
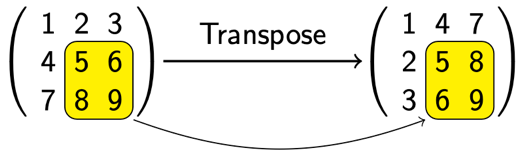
Figure 9.9 – Background highlighting a part of a matrix
\documentclass[tikz,border=10pt]{standalone}
\usetikzlibrary{matrix,positioning,quotes,fit}
\usetikzlibrary{backgrounds}
\tikzset{standard/.style={matrix of nodes,left delimiter={(},right delimiter={)},inner sep=0pt,nodes={inner sep=0.3em}}}
\tikzset{submatrix/.style = {rectangle, rounded corners,
  fill=yellow, draw, inner sep=0pt}}
\begin{document}
\begin{tikzpicture}[every node/.append style={font=\sffamily}]
  \matrix[standard] (m)  {
       1 & 2 & 3 \\
       4 & 5 & 6 \\
       7 & 8 & 9 \\};
  \matrix[standard,right = 3cm of m] (n) {
       1 & 4 & 7 \\
       2 & 5 & 8 \\
       3 & 6 & 9 \\};
  \draw[->,shorten <=1em,shorten >=1em,thick] (m.east) to["Transpose"] (n);
 \begin{scope}[on background layer]
   \node (m1) [submatrix, fit=(m-2-2) (m-3-3)] {};
   \node (n1) [submatrix, fit=(n-2-2) (n-3-3)] {};
 \end{scope}
 \draw [->] (m1.south east) to[bend right=20] (n1.south west);
\end{tikzpicture}
\end{document}
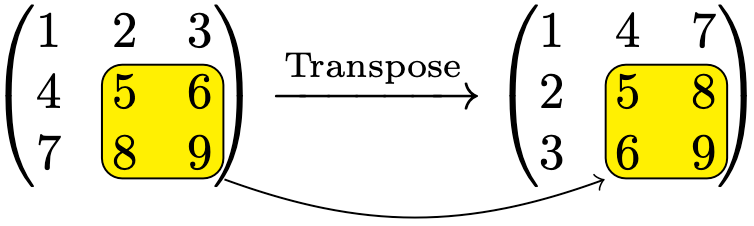
Figure 9.10 – Drawing in the background of a LaTeX equation
\documentclass{article}
\usepackage{amsmath}
\usepackage{tikz}
\usetikzlibrary{fit,tikzmark}
\tikzset{submatrix/.style = {draw, rectangle, rounded corners,
  fill=yellow}, inner sep=2pt}
\pagestyle{empty}
\begin{document}
\begin{tikzpicture}[overlay, remember picture]
  \node (m) [submatrix, fit={([yshift={1.5ex}]pic cs:m1) (pic cs:m2)}] {};
  \node (n) [submatrix, fit={([yshift={1.5ex}]pic cs:n1) (pic cs:n2)}] {};
  \draw [->] (m.south east) to[bend right=20] (n.south west);
\end{tikzpicture}
\[
  \begin{pmatrix}
       1 & 2 & 3 \\
       4 & \tikzmark{m1}5 & 6 \\
       7 & 8 & 9\tikzmark{m2}
  \end{pmatrix}
  \xrightarrow{\text{Transpose}}
  \begin{pmatrix}
     1 & 4 & 7 \\
     2 & \tikzmark{n1}{5} & 8 \\
     3 & 6 & 9\tikzmark{n2}
  \end{pmatrix}
\]
\end{document}
Figure 9.11 – Drawing in the background of LaTeX pages
\documentclass{article}
\usepackage[english]{babel}
\usepackage{tikz,blindtext}
\usepackage{atbegshi}
\AtBeginShipout{\AtBeginShipoutAddToBox{\tikz[overlay,remember picture]]
  \node[rotate=40,scale=10,lightgray,font=\bfseries]
    at (current page.center) {DRAFT};}}
\pagestyle{empty}
\begin{document}
\blinddocument
\end{document}
Please rate (and possibly review) the book on Amazon if you got it there, your feedback means much to me and helps to get an extended second edition!
Go to next chapter.